Vegetable Oil - A Fuel For Your Car?

By: Jamie Weaver

I was filtering vegetable oil for my truck the other day and decided it would be a good topic to write about.  There are a lot of misconceptions about running a vehicle on vegetable oil and I wanted to clear some of them up.  I converted my 1984 GMC Suburban to run on Waste Vegetable Oil 8 years ago and it hasn't given me any trouble…well the veg oil system hasn't…the truck itself is pretty old and has given me it's share of headaches.  

Waste Vegetable Oil (WVO) means that the oil is used, generally by restaurants, and would otherwise be thrown away.  This is an important distinction as some biodiesel companies are using vegetable oil produced specifically for biofuels.  This poses potential issues as growing crops for these fuels uses land, water, nutrients and other resources that could otherwise be used for growing food.  The growing popularity of these fuels could lead to the decimation of large tracts of land, not to mention all the fossil fuels used in the production of the oil in the first place.

Another word for the fuel I am using is Straight Vegetable Oil (SVO) which means what it sounds like, pure vegetable oil.  This is opposed to biodiesel which is a mixture of vegetable oil and very specific ratios of lye and methanol.  Adding these chemicals to vegetable oil makes it possible for any standard diesel vehicle to run on this fuel, where with SVO the vehicle itself must be converted.  I prefer converting the vehicle over the fuel as I don’t have any interest in dealing with corrosive chemicals on a regular basis.  Also, converting the vehicle is a onetime deal, while converting the fuel must be done every time you get a new batch.

Only diesel vehicles can be run on vegetable oil.  There are other creative things that can be done with standard gas cars such as making your own ethanol from plant matter such as corn, beets or potatoes (much like distilling alcohol) and converting your vehicle to run on 85% ethanol.  But, unless you can find ways to use a waste product, this again creates competition with food production.

Diesel vehicles are actually very well equipped to run on vegetable oil as is. The first diesel engines, though created to run on coal dust, were soon found to be able to run on peanut oil without trouble.  Although present day diesel engines are more suited to run on petroleum based diesel fuel, functionally the main difference from vegetable oil is the viscosity.  Vegetable oil is much thicker than diesel and must be thinned out before it can be vaporized and combusted in a standard diesel engine.  The most common way to do this in a SVO converted vehicle is to heat up the oil until it reaches about 175 degrees Fahrenheit.  This is generally done by running the coolant lines along the vegetable oil fuel lines and through the inside of the vegetable oil tank.  When the vehicle is running the coolant heats up and in turns heats the oil in the tank and fuel lines.  In order for this to work the vehicle must be started on regular diesel fuel then be switched over to veg oil once warmed up.  Since diesel combusts at 410 degrees Fahrenheit, this doesn’t take long.  I generally wait until I’ve driven about a mile and a half before switching over to vegetable oil.  Likewise I switch back to diesel a mile and a half before I get where I’m going.  This purges the lines of vegetable oil and makes sure there is diesel in the engine when I go to start again. 

There are really only a few components that need to be altered or added to your vehicle for this system to work. You need to add a second tank to your vehicle, fuel selector valves, and some toggle switches so you can switch from one tank to the other.  You also need some additional fuel line, a bunch of coolant line to splice into your existing coolant system and an additional fuel filter for your vegetable oil.  But that’s about it.  To get the details and learn the full process you will have to come to our class on Vegetable Oil Conversions (to be announced)

But let’s talk about filtering the oil.  As I stated before Waste Vegetable Oil is the used oil from the deep fryer at restaurants.  Restaurants can only use the same oil so long before they have to change it out.   Prior to the increase in biodiesel and veg oil vehicles, restaurants generally had to pay to get rid of their used oil and were more than happy to have you take it off their hands.  Now many restaurants have contracts with biodiesel companies that pay to take their oil from them.  This makes it much harder to find oil for personal use.  But not all restaurants have been swooped up and persistence pays off.

When you finally get some oil it is often rancid and mixed with burnt French fries and chicken fat.  Don’t worry, this oil will still work fine, however this is not something you put directly in your tank.  It would be great if we could just pull up to a McDonalds every time we were running low on fuel and fill up right there.  But that is generally not the case.  Although I have heard of a quick filtration method using a centrifuge filter that essentially spins the oil and splats all the unwanted solids against the outside, allowing the person to filter oil as they collect it and put it directly in their tank.  Most people however use a much slower process. 

My first step in filtering oil is to let it settle for a week or so.  This allows the fatty solids to settle to the bottom so you can pour the clear oil off the top.  Skipping this step will clog any filter in seconds.  I then pour the oil through a 100 micron screen filter into a 55 gallon drum.  This filters out any old french fries or debris that might be floating in your oil and any fatty gunk that made it through the pouring process.  

The next stage involves running the oil through 2 more filters, a 10 micron filter and a 1 micron filter.  The standard fuel filter in your vehicle filters to about 10 microns, so doing it to 1 micron is a little bit overkill, but doing so means I won’t have to worry about the filter in my truck clogging up mid drive and it is a lot easier on my engine and the injector pump in the long run.  For this process I use 2 standard in-line water filters that I hooked up to the bottom of my drum.  Notice that I attached the pipe a few inches from the bottom.  I try not to pour any new oil into the drum for at least a few days before I start pumping the oil through these filters.  Leaving a little space at the bottom of the drum gives a place for any leftover fatty solids to settle so they don’t clog up the filters. 

To pump the oil through the filters I use a 12V water pump that was made for use in an RV.  I hook it up to my truck battery and attach it to the end of my filters.  It works pretty well and I don’t need an on-grid power source to use it.  Doing the filtering sequentially like this, 100 microns then 10 microns then 1 micron, helps keep your filters from clogging which also keeps the rate of flow up.  It takes about a minute to fill up this 2 ½ gallon gas can, then I pour it into my tank and I’m ready to go!  If your system is set up somewhere you can drive up to you can pump the oil straight into your tank.  The veg oil tank in my truck holds about 30 gallons, so I can get about 2 fill ups from one full drum of oil.  It usually takes me long enough to go through that much oil that the next batch has adequately settled and is ready to filter.

I Hope this has been a useful summary and has peaked your interest a bit about alternative fuel sources.  Thanks for checking us out!

My trusty luck dragon - Falcor

My trusty luck dragon - Falcor

Fuel Selector Valve

Fuel Selector Valve

Toggle switches

Toggle switches

vegetable oil filter wrapped in coolant lines

vegetable oil filter wrapped in coolant lines

100 micron screen filter

100 micron screen filter

Filter System

Filter System

St. John's wort - A favorite summertime medicinal plant

By: Gabe Garms

A good indicator of the arrival of summer here in the Pacific Northwest is when the roadsides begin to pop with the bright yellow flowers of Hypericum perforatum, also known as St. John's wort. It's an introduced species here in the United States and grows throughout most of the country. Hypericum loves human disturbance and tends to grow near edges, such as roadsides and open lots and meadows, where you'll typically find it in abundance. Many consider it a noxious weed, but hopefully after reading this article, you'll see that it truly is a magical plant.

When harvesting wild plants for medicine, the first and most important thing to consider before you begin is that you're harvesting the correct plant. There are other lookalike plants that grow amongst Hypericum in the wild that can be toxic if ingested. So before I dive into the magic that is this herb, let's first learn how to identify it correctly. 

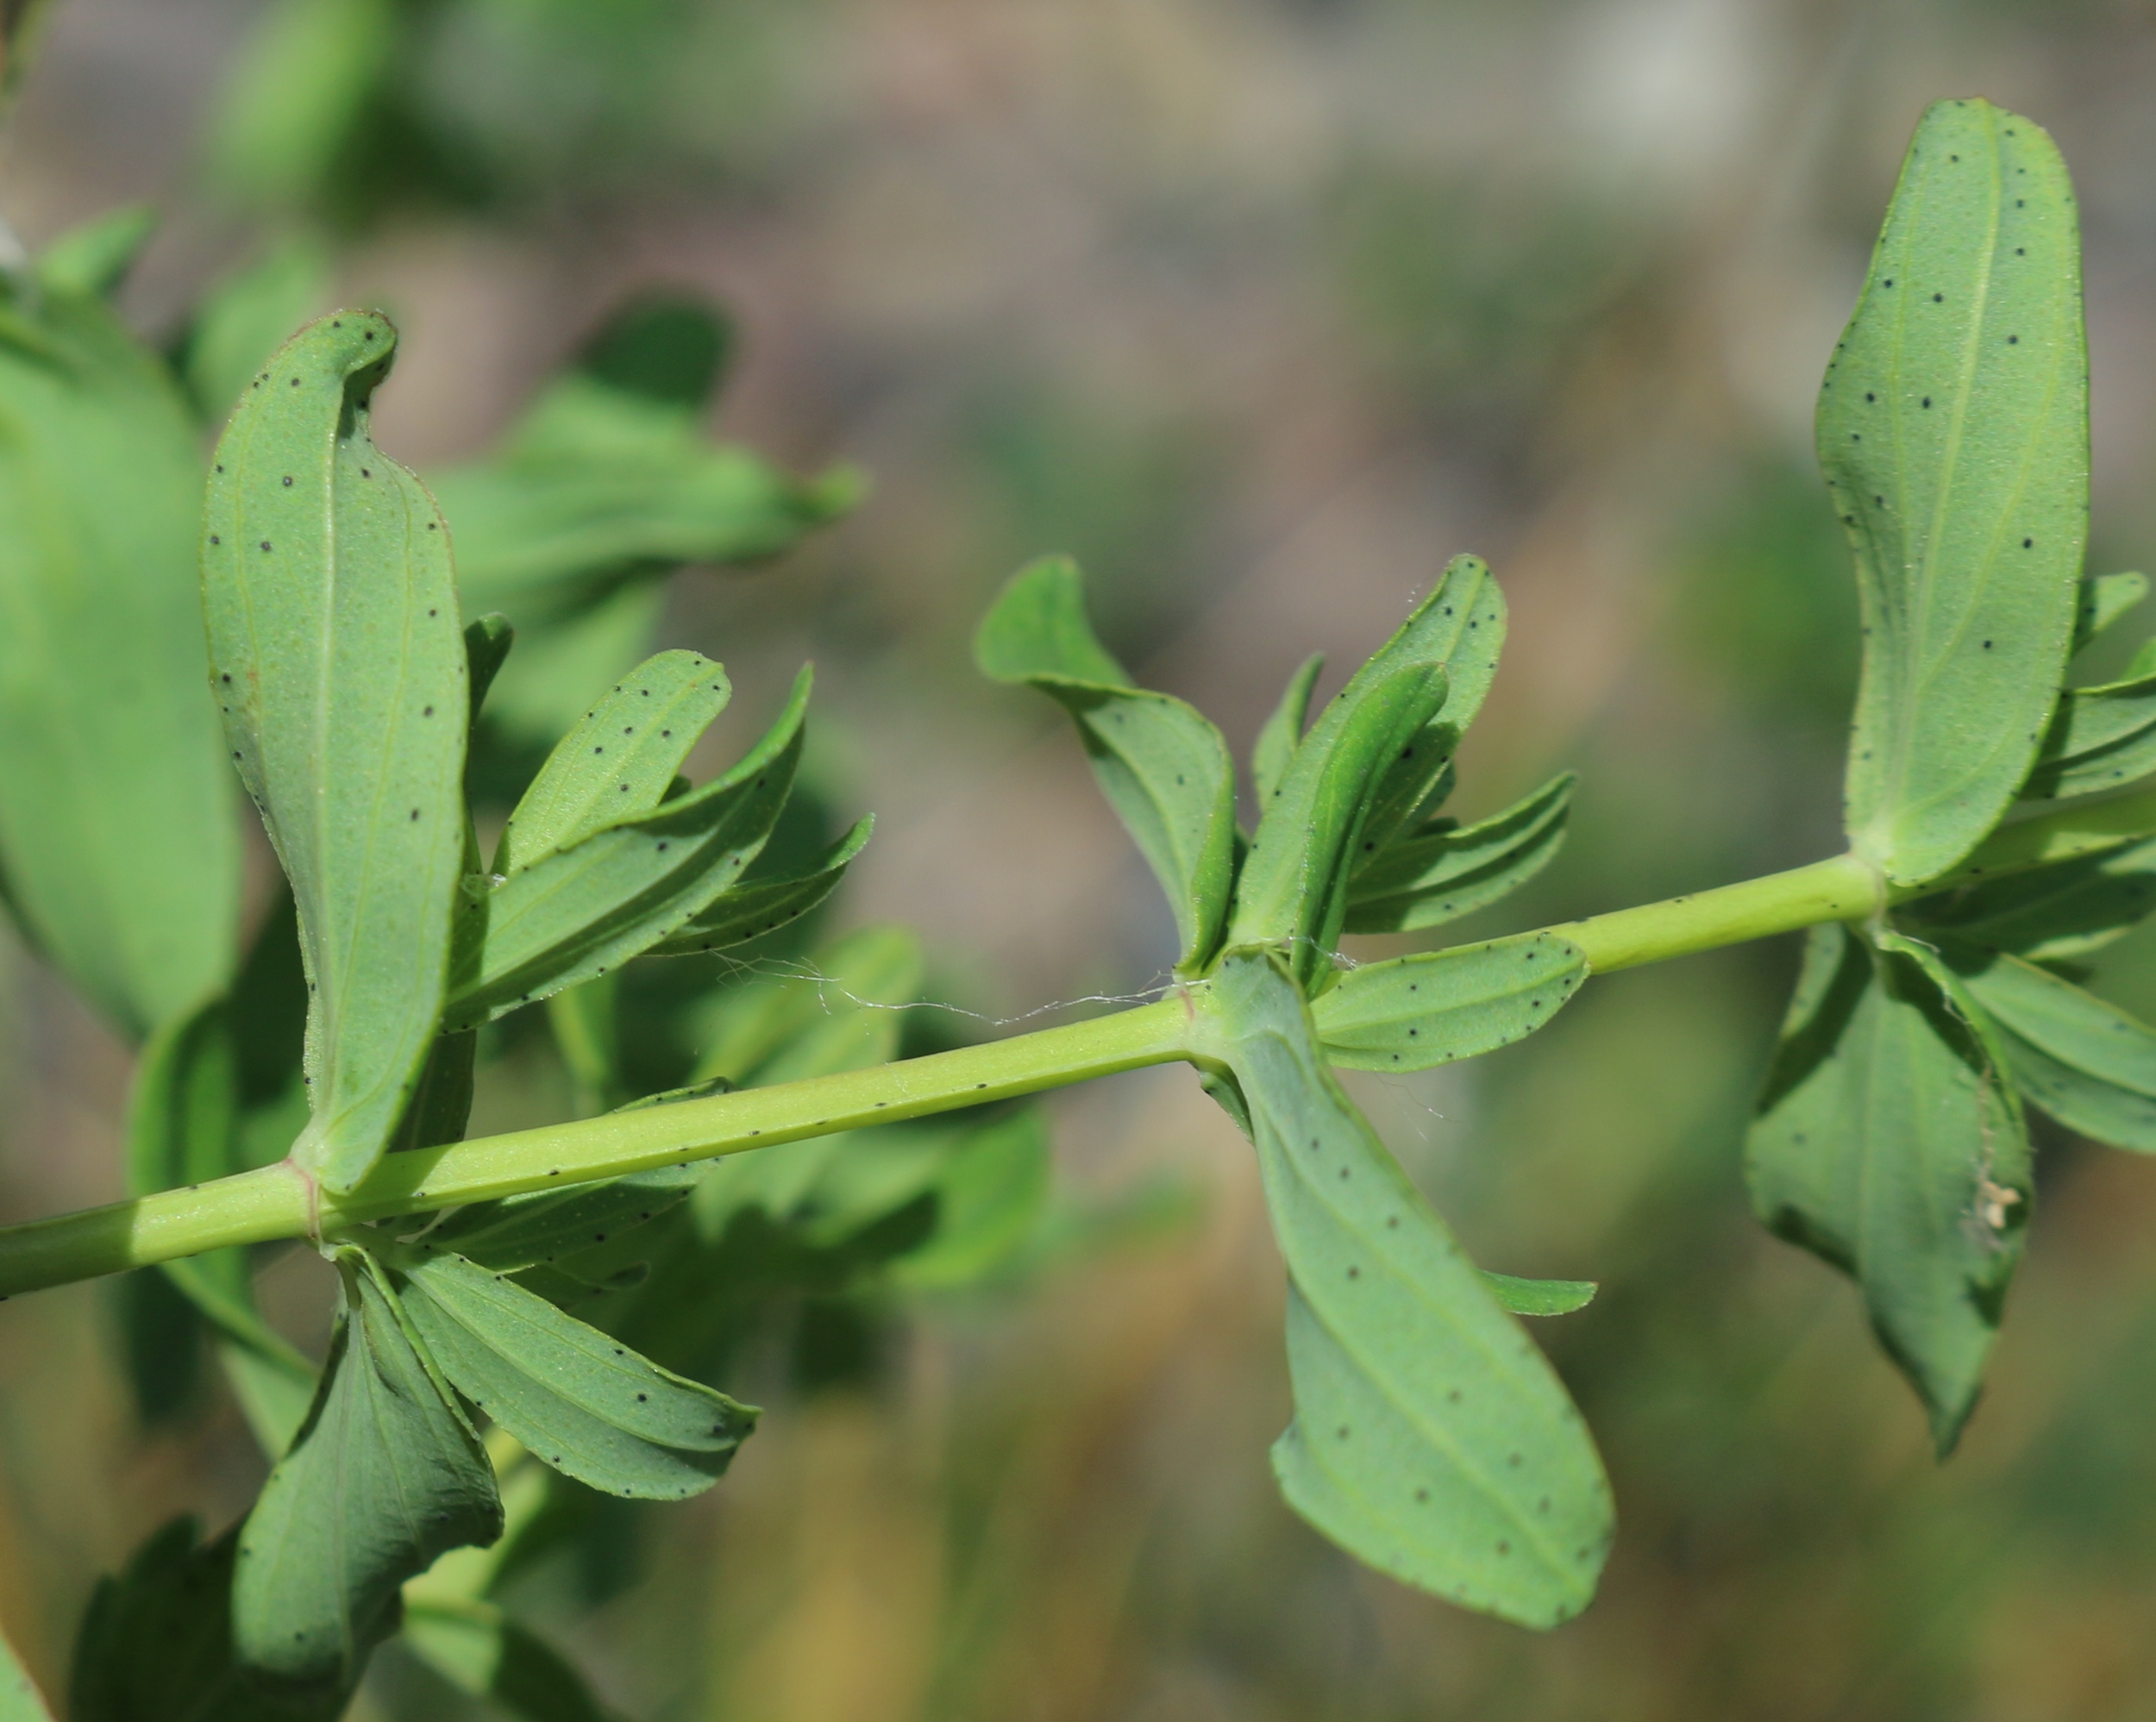
If you look at the picture to the top right, you'll notice the flowers are bright yellow, have 5 petals and numerous stamens bursting from the center. In the second picture, notice that the leaves are growing off of the stem opposite of one another and will occasionally have little red specks on the underside (the red specks are the active ingredient - hypericin). Now look at the third picture and notice that if you hold a leaf up into the light, there are numerous little transparent holes (hence the name perforatum - which is latin for perforated). So now that we've correctly identified Hypericum perforatum, now let's get into all of the fun stuff.

MEDICINAL VALUE:

While this herb is incredibly medicinal, it deserves much respect and can hurt you just as easily as it can heal you. Before I get into it's medicinal uses, I feel it's important to state that you shouldn't take Hypericum if you're taking any kind of pharmaceutical drugs. While it doesn't negatively interact with all pharmaceuticals, I would recommend playing it safe and not risk mixing them together. It should also be avoided by people who are bi-polar or experiencing any kind of psychosis. I've seen someone take it with a form of psychosis and it likely magnified this person's condition. Also review the dosages section below before you begin to use this herb.

The main active constituent (ingredient) in Hypericum perforatum is a red compound called hypericin. It's taken medicinally as either an oil or a tincture (I discuss how to make both towards the end of the article) and it's used to treat the following:

  • Back pain - The oil is used topically to treat pain caused by nerve damage. Specifically, it's great for back pain (ie sciatica nerve damage).
  • Depression - The tincture is used to treat a fleeting bout of depression - caused by a loss or a sudden change in your life. I've found that herbs like motherwort and wild rose are much safer alternatives for prolonged use and for children. But I have seen Hypericum work many times for people who are feeling down.
  • Retroviruses such as HIV and Herpes - The oil can be applied to cold sores and the tincture is used to treat both viruses. There are quite a few scholarly articles (search Hypericum perforatum on google scholar) out there about the effectiveness of this herb in the treatment of both HIV and HSV. I also have a friend who has seen it work with a family member.
  • Attention Deficit Disorder - Since it strengthens and rejuvenates the central nervous system, it eases the anxiety associated with ADD by bringing you back into balance. I have ADD myself and Hypericum tincture has worked great for me at times when I need to focus. 
  • Tonic for the Central Nervous System - The tincture helps rejuvenate, strengthen and restore function to the CNS. However, it should only be taken for a short time. For long term strengthening of the CNS, I personally use oatstraw as an infusion. I'll write an article about oatstraw this coming fall when it comes time to harvest.

OTHER USES:  

  • Sunscreen - The oil is applied to the skin. Many different commercial sunscreens are being linked with cancer, and hypericum is a natural, safe and effective alternative.
  • Pollinator attractor - Hypericum has been documented to attract numerous pollinator insects.

HARVESTING:

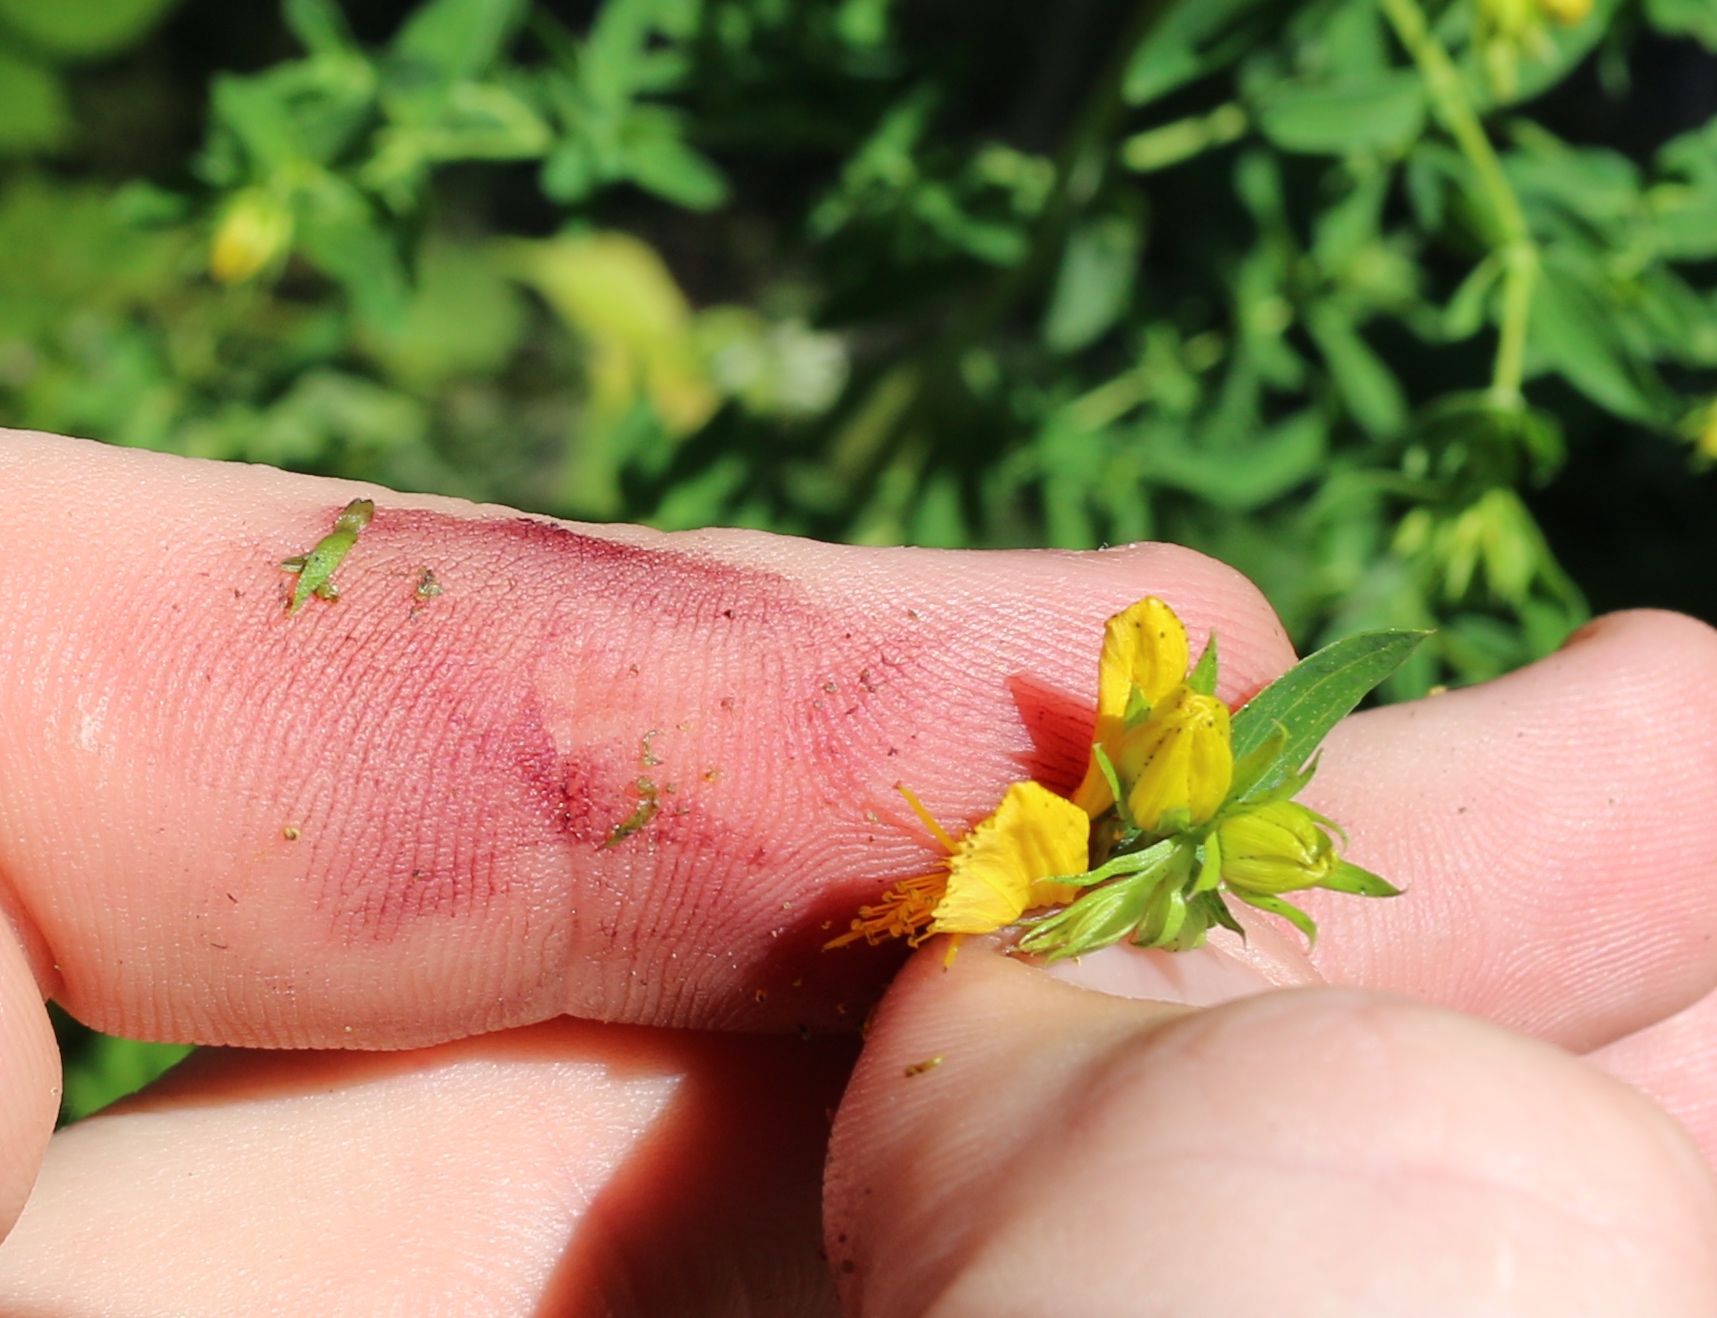
June is the best time to harvest the plant, which is why I wanted to post this article now. You want to harvest the top third of the flowering plant (flowers, stems and leaves), and to ensure that you're getting the most medicinally potent plants, you'll want to perform the crush test (this test also helps with identification). Simply take a couple flowers/buds and crush them between your index finger and thumb. If a distinct red stain is left behind (see picture to the right), that means it's loaded with hypericin and you've found a great plant to harvest. After hypericum has been in flower for awhile, it loses it's potency and doesn't stain when crushed. So if you're looking to make the most potent medicine, the crush test is a good habit to get into before the harvest.

PREPARATION:

Just as Hypericum loses it's potency after it's been in flower for awhile, it also becomes significantly less potent when it's dried. Because of this, it's not very useful as a tea and is most effective as either an oil (to be applied topically) or as a tincture. 

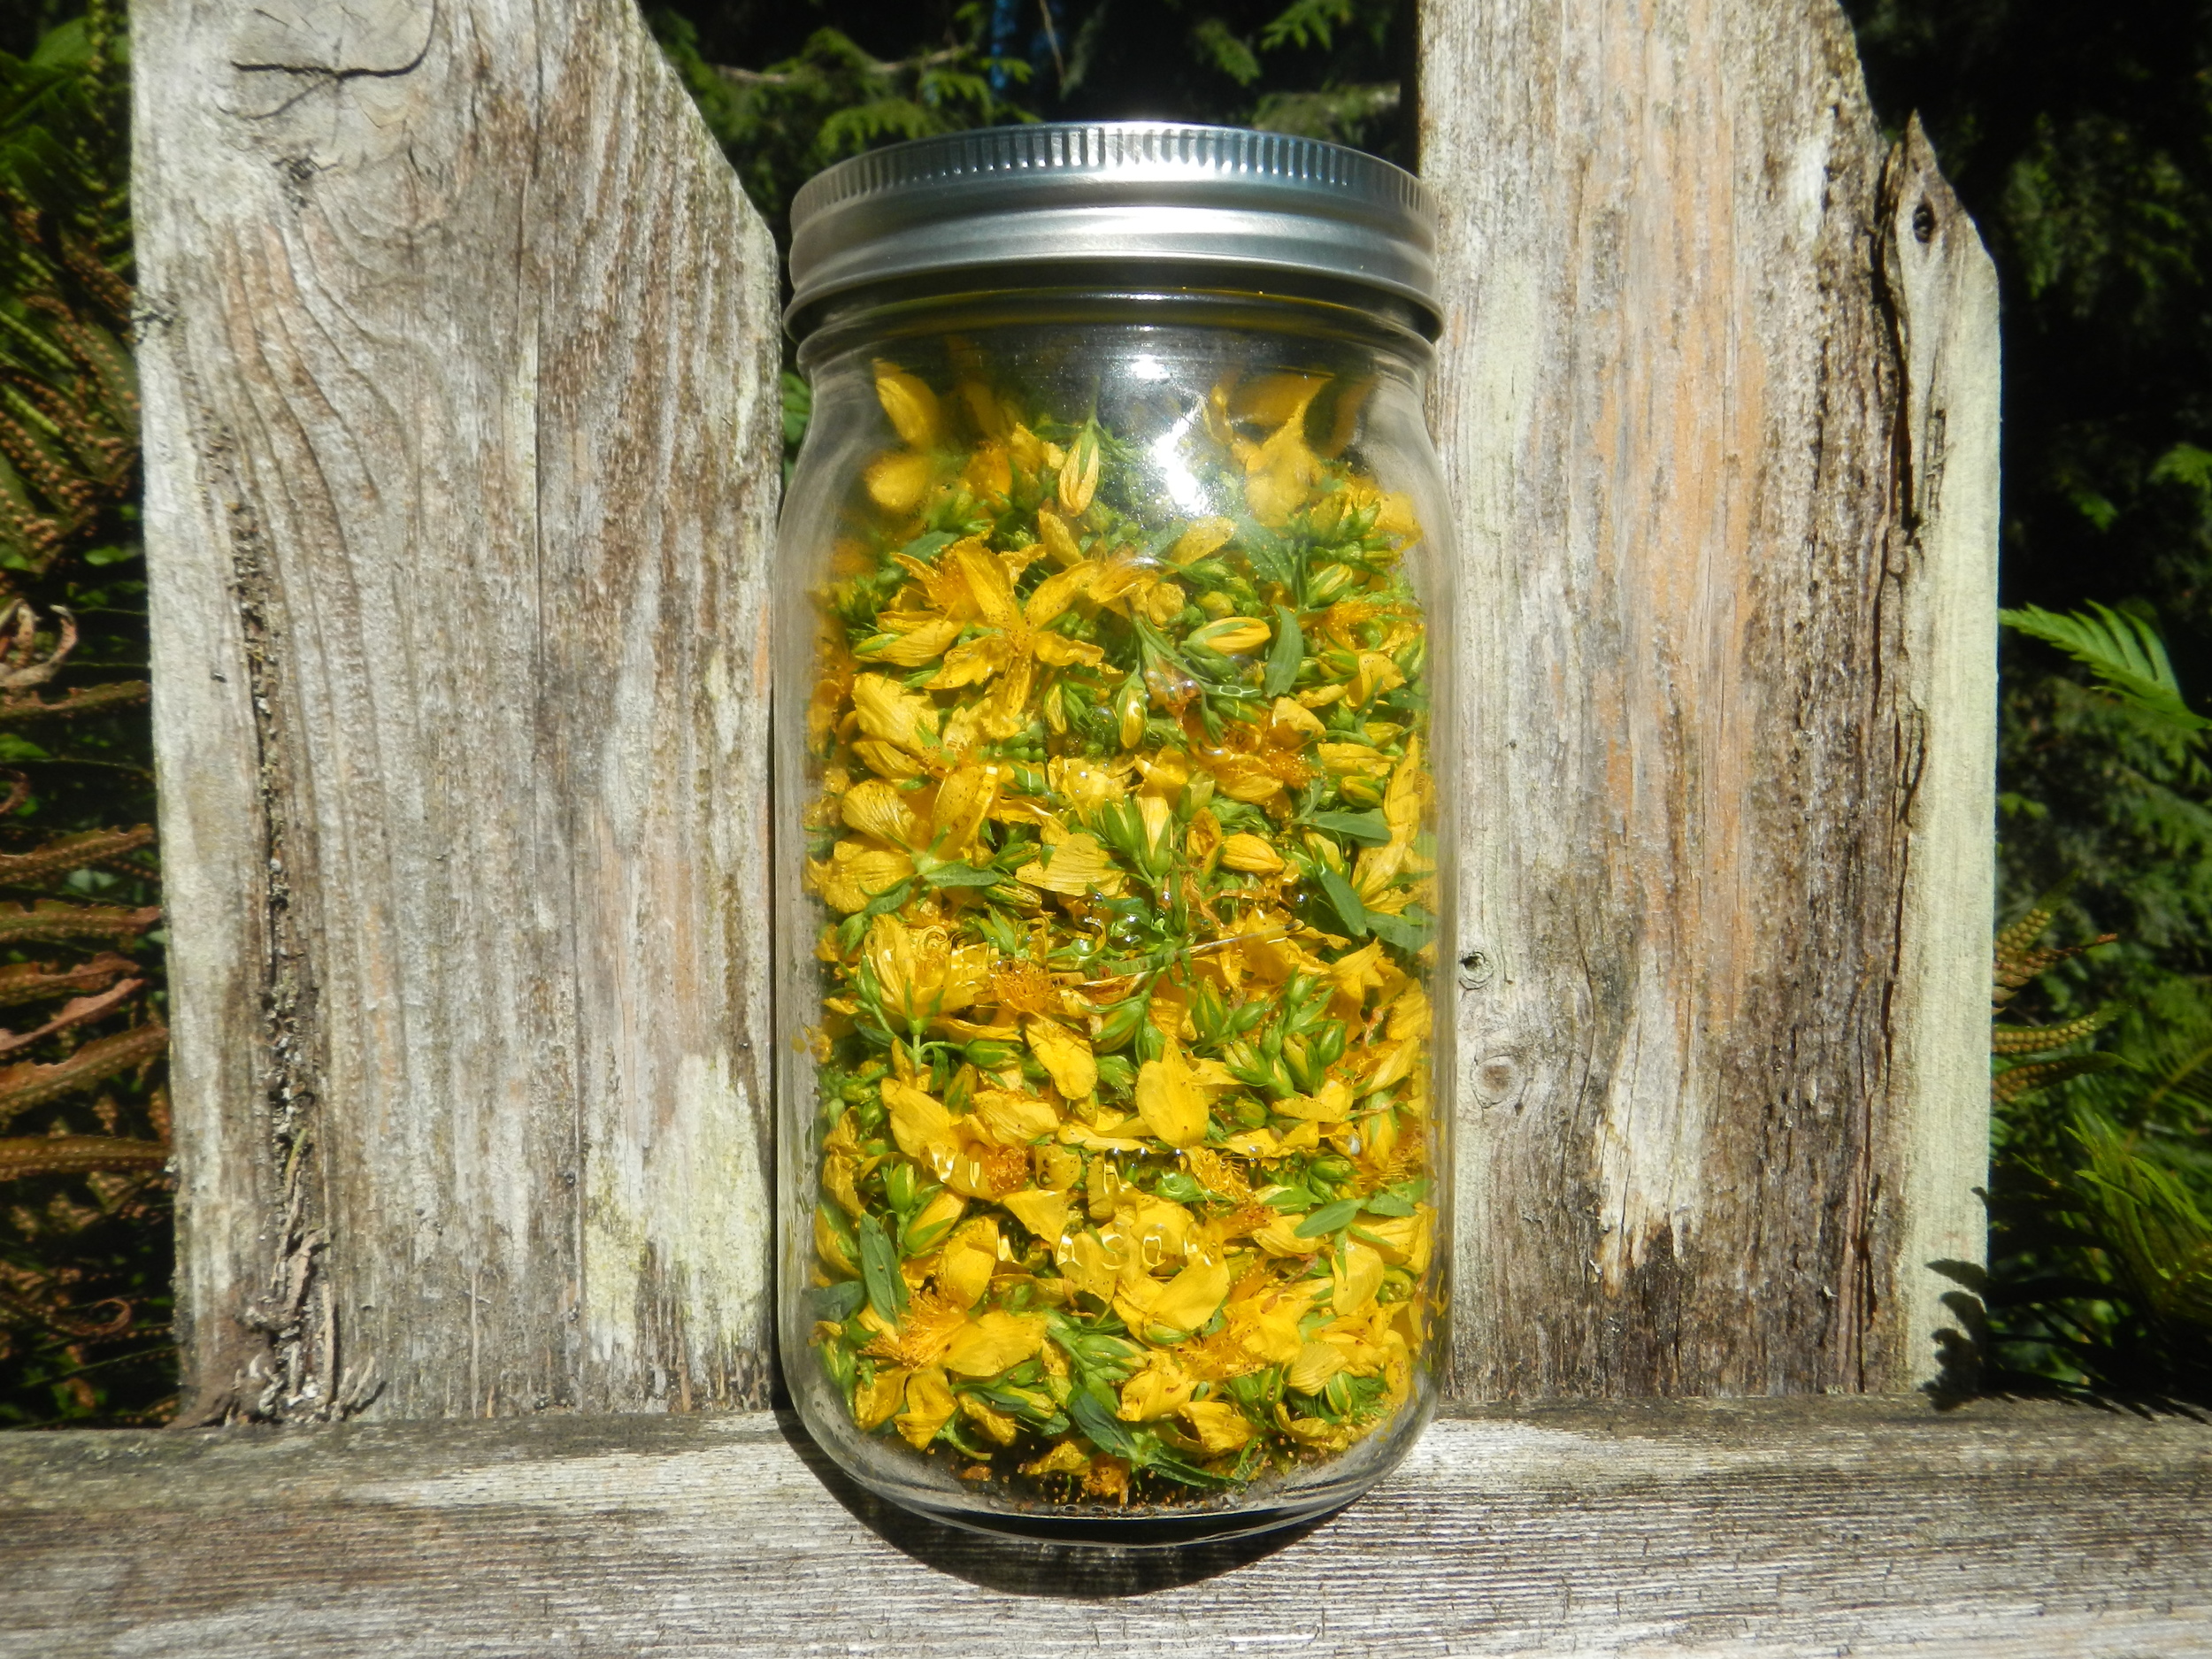
To make the oil, fill a mason jar with fresh plant material (see picture above right), and fill the jar with olive oil almost to the top.  Now cover the jar with a paper towel and secure it with a rubber band. This method is recommended because you want to allow the moisture that the freshly picked plant releases to escape the jar. If you seal the jar with a metal lid, the trapped moisture can ruin your oil. Let the oil sit for 4-6 weeks in a cool, dark place and then filter the plant material out. The oil stays good for 1-2 years.

To make the tincture, pack the jar with fresh plant material and add 80-100 proof grain alcohol almost to the top (I typically use unflavored vodka). Now seal the jar with a metal or plastic lid and store in a cool, dark place for 6 weeks. Shake the jar once per day for the first couple of weeks. Filter out the plant material and store in a dark colored bottle. The tincture stays good for 5+ years.

DOSAGES:

I was recently listening to a podcast by one of my favorite herbalists, Jim McDonald, and he said something pretty profound regarding tincture dosages. He said that the correct dosage is the minimum amount of the herb that it takes to cure the ailment. So while some herbalists recommend taking 20 drops of the tincture 2-3 times per day, Jim instead recommends taking 5 drops at a time more frequently throughout the day. I have been trying this with my own tincture intake and I've definitely noticed a difference. So with Hypericum you can either take 20-30 drops 2-3 times per day or 5 drops more frequently throughout the day. But remember not to take it for long periods of time and start slow. What I mean by that is to start your dosages on the small side (5 drops or so) to see how your body reacts before you increase your dosage.

So hopefully you've learned a thing or two about an herb which is probably growing on or near your property. As you get to know it, give it the respect that it deserves and it will become a great ally. Thanks for reading!

DISCLAIMER: I am not a doctor and the above information is solely meant for educational purposes. For medical advice, please consult a medical healthcare professional. 


Hypericum flowers

Hypericum flowers

Opposite leaves. red specks are hypericin

Opposite leaves. red specks are hypericin

Notice the transparent holes in the leaf

Notice the transparent holes in the leaf

The Crush Test - Notice the Red stain

The Crush Test - Notice the Red stain

Mason jar filled with hypericum Flowers and Leaves

Mason jar filled with hypericum Flowers and Leaves

Some Tips on Bow-Making

Some Tips on Bow-Making

I have been playing with some different methods for working bow staves down to the floor tillering phase, and I wanted to share what I have learned.  I personally prefer using hand tools throughout the whole bow-making process, which can lengthen the time significantly compared to using a ban saw to cut out a blank.  However, where it use to take me most of a day to rough out the basic shape of a bow using a hatchet, I’ve found a method that brings that time down to about  half an hour. 

Read More

Welcome to Raven's Roots

We couldn't be more excited to open our doors to the public in August of 2015. We will be hosting a community potluck on Saturday, August 15th on our campus in Sedro-Woolley, WA to celebrate the new beginning. Our first official course, the Ethnobotany Apprenticeship, will begin during the last weekend of August with the Tracking and Hunter/Gatherer Apprenticeships following on shortly afterwards. We will be offering short courses in Wild Friction Fire, Short Term Survival and Bird Language and Behavior during the Fall months as well.

The purpose of this blog is to educate our audience with videos, articles and general posts which capture all of the projects that we are working on in our free time relative to homesteading and naturalist studies. We're also open to having guest posters periodically to widen our knowledgebase so please contact us if you have anything relative which you'd like to share.